
When I had my first foot surgeries, they were way more invasive and I was non-weight-bearing for six weeks. That is a long time to be on crutches and who wants to be on some boring metal crutches for that long? Not me, that's for sure. So I decided to decorate my crutches after each surgery to make them a bit cuter. Although I am not going to be on crutches for as long this time (thank God), I do have to use them for the next week or so to help me walk, so I decided to use this time of sitting around doing nothing to spruce them up again.
I actually have formal on Saturday so I picked a light pink color that will go with my dress (which I will feature on the blog this weekend) and it is perfect for Relay For Life today since this year I am relaying for my aunt who has Breast Cancer.
To decorate your crutches, all you need is a pair of scissors, some ribbon, and a hot glue gun. Seriously, so simple. Here are the steps to decorating your crutches since they look cute. Fair warning, if you're on heavy pain meds, this is easy enough to accomplish, but you might want to consider some assistance with that glue gun if you're feeling loopy!
Steps:
One: Remove the handles of the crutches
Make sure you don't lose the screws and remember what setting you have the handles on!

Two: Begin to wrap the crutches with ribbon
Start wrapping them from the top of the crutch. Hot glue the first piece of ribbon you use so that it sticks and wrap once around the top in a straight loop. Then do another dot of hot glue to hold that loop there. Once you've done that, start wrapping the ribbon around the crutches going diagonally down the crutches in an even pattern so that the ribbon looks even. Put a dot of hot glue down every couple of loops so that it holds throughout the process. I recommend putting gluon the inside of the crutch so that you cannot see it. After you wrap one side, leave a tail of about 6 inches of ribbon and cut it from the rooll.
Three: Wrap the Second Side.
Repeat Step Two on the other side, making sure to wrap the crutch in the same direction. Once you reach the bottom of the side, glue it off but do not cut the ribbon.
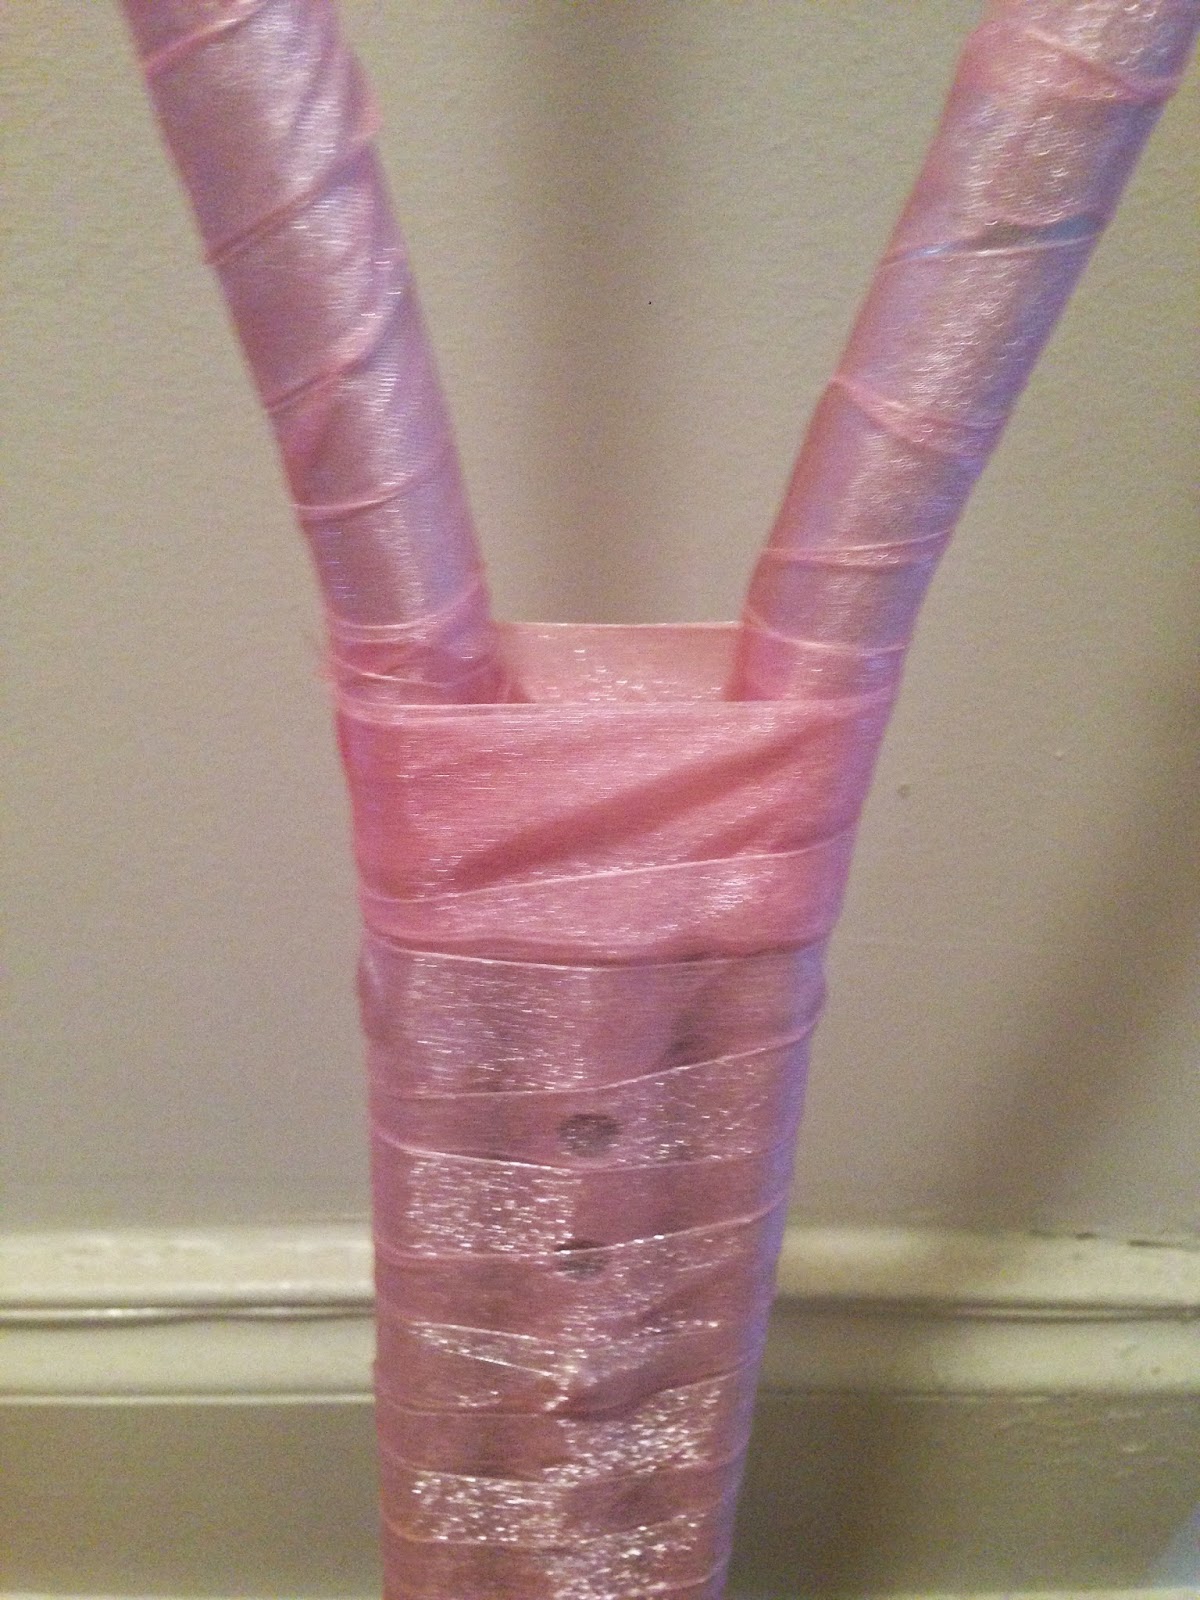
Four: Wrap the Base of the Crutch
Personally, for this step, I like to incorporate both the ribbon with the 6in tail and the ribbon on the roll so it's a smooth transition. Wrap the ribbon around the bottom of the crutch handles horizontally before you go diagonally down. This way you can't see the glue dots, and you can finish off the short tail. Continue wrapping around the crutch until you get to the bottom.

Five: Glue it
Finish the ribbon off with a full strip of glue (you don't need to use much, but use a strip so that the edges don't peel off) and cut as close to the glue line as possible. I wrapped mine a couple of times around the bottom, because this is one of those places that can get messed up, pretty easily.
 Six: Replace the Handles
Screw the handles back in place. Choose which way to put them in based on how the ribbon wrapping went, just put the better side in front!
Happy Crutching!
xx
erin
*I prefer the sheer ribbon because it doesn't show the glue marks as much as the grosgrain ribbon does since it doesn't change the color. The wireless ribbon is definitely easier to manipulate than wired ribbon. However, any ribbon will technically work.
I actually have formal on Saturday so I picked a light pink color that will go with my dress (which I will feature on the blog this weekend) and it is perfect for Relay For Life today since this year I am relaying for my aunt who has Breast Cancer.
To decorate your crutches, all you need is a pair of scissors, some ribbon, and a hot glue gun. Seriously, so simple. Here are the steps to decorating your crutches since they look cute. Fair warning, if you're on heavy pain meds, this is easy enough to accomplish, but you might want to consider some assistance with that glue gun if you're feeling loopy!
Materials:
Crutches
2 Rolls 10yd Sheer Wireless Ribbon- 1.5"*
Hot Glue Gun
Scissors
Steps:
One: Remove the handles of the crutches
Make sure you don't lose the screws and remember what setting you have the handles on!
Two: Begin to wrap the crutches with ribbon
Start wrapping them from the top of the crutch. Hot glue the first piece of ribbon you use so that it sticks and wrap once around the top in a straight loop. Then do another dot of hot glue to hold that loop there. Once you've done that, start wrapping the ribbon around the crutches going diagonally down the crutches in an even pattern so that the ribbon looks even. Put a dot of hot glue down every couple of loops so that it holds throughout the process. I recommend putting gluon the inside of the crutch so that you cannot see it. After you wrap one side, leave a tail of about 6 inches of ribbon and cut it from the rooll.
Three: Wrap the Second Side.
Repeat Step Two on the other side, making sure to wrap the crutch in the same direction. Once you reach the bottom of the side, glue it off but do not cut the ribbon.
Four: Wrap the Base of the Crutch
Personally, for this step, I like to incorporate both the ribbon with the 6in tail and the ribbon on the roll so it's a smooth transition. Wrap the ribbon around the bottom of the crutch handles horizontally before you go diagonally down. This way you can't see the glue dots, and you can finish off the short tail. Continue wrapping around the crutch until you get to the bottom.
Five: Glue it
Finish the ribbon off with a full strip of glue (you don't need to use much, but use a strip so that the edges don't peel off) and cut as close to the glue line as possible. I wrapped mine a couple of times around the bottom, because this is one of those places that can get messed up, pretty easily.
Screw the handles back in place. Choose which way to put them in based on how the ribbon wrapping went, just put the better side in front!
Happy Crutching!
xx
erin
*I prefer the sheer ribbon because it doesn't show the glue marks as much as the grosgrain ribbon does since it doesn't change the color. The wireless ribbon is definitely easier to manipulate than wired ribbon. However, any ribbon will technically work.
what a crutch
ReplyDeleteCrutches are recommended by doctors for individuals who have transitory wounds because of either a mishap or surgery. These gadgets are anything but difficult to utilize and individuals move around their home.
ReplyDelete